I made this gift card holder for one of my daycare provider's daughter's birthday party. I made it because I didn't have any time to go shopping for a gift as we had had tons of snow! As it turns out, we didn't make it to the party because Sweet Pea was CRABBY after missing her nap due to sledding with DH!
So I followed a video tutorial that I had seen Jennifer McGuire do on the Hero Arts blog. I couldn't locate it on that blog, but did find it on her blog (here).
This second shot is what it looks like when you open it up! The gift card slips behind the circle that says "...and many more!". It was super easy. All I had to do was two score lines, three folds and one little cut with a craft knife! It was fast too, so it qualifies for the Ways to Use it Challenge # 197 on SCS!
Here are the details for this card:
Stamps: Birthday Whimsy
Paper: Pixie Pink, Whisper White, BG Urban Prairie
Ink: Pixie Pink
Accessories: 3/4", 1", 1 1/4", 1 3/8" circle punches, Scallop circle punch, thin satin ribbon (JoAnn's), stampin' dimensionals, ticket corner punch
Pages
▼
Sunday, December 21, 2008
Thursday, December 18, 2008
Hip Hop Challenges!
Today was a snow day at school! So I stayed inside and Hip Hopped my way through Thursday with the crafters in the Unity forum. Each Thursday, there are a couple of challenges to work on when you are not chatting or playing for prizes. Today, I did the Unity Pie Color Challenge first! My dh loves blackberry pie, so I did this one for him. I still feel like I want to make Christmas cards, so I used my new Unity Christmas stamps. (So Girl's Night girls, don't look to close. You may end up with one of these cards!) I also used Julee Tilman's Mojo Monday sketch for the card.
Here are the details for this card:
Stamps: Stocking of Elegance (Unity), Tree of Elegance (Unity), All Year Cheer
Paper: Very Vanilla, Chocolate Chip, Perfect Plum
Ink: Versamark, Chocolate Chip, Perfect Plum
Accessories: Clear ep, heat tool, eggplant grosgrain ribbon, Sakura Clear Star gel pen, blender pen
Techniques: Embossing
The second card uses today's sketch from Limelight Papercraft's Six Chick Challenge #11. The product that they focused on is your favorite patterned paper! I chose Basic Grey, of course! The Hip Hop challenge here was Don't Stress - Distress! So I sponged up my card stock, used my Distressed Dots stamp from Unity and roughed up my edges with my MM distressing tool!
Strangely enough, I used a similar color scheme and I altered the sketch a bit so that my card looks a bit like my last Six Chicks Challenge! Oops!
Here are the details for this card:
Stamps: Trinity Trio (Unity), Distressed Dots (Unity), Sincere Salutations (SU)
Paper: Whisper White, Chocolate Chip, Certainly Celery, BG Mistletoe & Pear, BG Two Scoops
Ink: StazOn Timber Brown, Certainly Celery, Tempting Turquoise
Accessories: MM distressing tool, stampin' dimensionals, blender pen, MAMBI rhinestones, Turquoise and Olive sharpies
Techniques: distressing, masking
All products are Stampin' Up! unless otherwise posted!
Here are the details for this card:
Stamps: Stocking of Elegance (Unity), Tree of Elegance (Unity), All Year Cheer
Paper: Very Vanilla, Chocolate Chip, Perfect Plum
Ink: Versamark, Chocolate Chip, Perfect Plum
Accessories: Clear ep, heat tool, eggplant grosgrain ribbon, Sakura Clear Star gel pen, blender pen
Techniques: Embossing
The second card uses today's sketch from Limelight Papercraft's Six Chick Challenge #11. The product that they focused on is your favorite patterned paper! I chose Basic Grey, of course! The Hip Hop challenge here was Don't Stress - Distress! So I sponged up my card stock, used my Distressed Dots stamp from Unity and roughed up my edges with my MM distressing tool!
Strangely enough, I used a similar color scheme and I altered the sketch a bit so that my card looks a bit like my last Six Chicks Challenge! Oops!
Here are the details for this card:
Stamps: Trinity Trio (Unity), Distressed Dots (Unity), Sincere Salutations (SU)
Paper: Whisper White, Chocolate Chip, Certainly Celery, BG Mistletoe & Pear, BG Two Scoops
Ink: StazOn Timber Brown, Certainly Celery, Tempting Turquoise
Accessories: MM distressing tool, stampin' dimensionals, blender pen, MAMBI rhinestones, Turquoise and Olive sharpies
Techniques: distressing, masking
All products are Stampin' Up! unless otherwise posted!
Recycled Earrings!
Here is my triple challenge from yesterday! The first challenge I went after was the Limited supply challenge on SCS (LSC198). It is called Going Green and the task was to reuse and recycle. So I found some snowflake earrings that I have been given when I was a teen and bent off the part of the snowflake that suspended it from the earring. I embossed it with white craft ink and clear ep! Then I attached it to my dp with mini glue dots!
I also used this week's Unity Sketch Challenge provided by Amber and the Unity Addicts Wednesday Challengewhich was to create a monochromatic card! For whatever reason, monochromatic is hard for me to do! I tried anyway!
Here are the details for my card:
Keywords: LS198 USC17 USCSC6 unity
Stamps: Sentiments O'Simple (Unity)
Paper: Whisper White, SU print pack, SU I Wish
Ink: Craft white
Accessories: MAMBI rhinestones, Red sharpie, recycled earrings, clear ep, heat tool, White gel pen, White taffeta ribbon
Techniques: embossing
All products used are Stampin' Up! unless otherwise noted.
Sunday, December 14, 2008
I love the weekends!
Plus it is snowing! We get snow every year, but generally not a lot! Yesterday, they were tiny little flakes that kept coming for about 7 hours! It only amounted to about 2 inches and I am sure that will be gone by this afternoon, but it was snow and it stuck! My dogs were going crazy playing in it and Sweet Pea was fascinated until we went outside. All she had to say then, "It's cold!". I promised hot cocoa with marshmallows and then she went outside!
So during nap time and cartoons, I got this card done! I got some new Unity and had to ink it up! I made this card for Jennifer Buck's quick card challenge for the Stamp Simply Celebration '08! Making it quick means using Julee Tilman's sketch and using some designer paper. My quick card took a little longer when I tried to incorporate some gold for the Stamp Something red, gold and green challenge. Embossing added time, but it was well worth it!
Looking back now, my scalloped edge layer needed a little something more. Oh well!
I used some new Unity here too! This one is called Trinity Trio. I used another sketch on this one! The sketch is the Six Chicks Sketch and Product Challenge #10. Mandy from Limelight Papercrafts posted it here. This card is pretty self explanatory, except for the color. I was trying to match the blue-green color in the dp, so I scribbled on some cellophane with my Tempting Turquoise and Certainly Celery. I mixed them up with a blender pen and colored my trees that way. Overall, I like it! I still need lots of work on my coloring skills. I think that is a strong deficit of mine. Any tips? Please let me know! I never took any art classes, I was always too busy with music:(
In retrospect, I should have stamped the trees with Timber Brown StazOn, but I don't think it is really noticeable.
This last card took quite a long time! I had to be upstairs anyway. Sweet Pea has a cold now and wasn't sleeping very well. She kept waking up and I had to go in and help her calm down and get back to sleep. It even happened two more times after dh and I went to bed!
I began this card for the Featured Stamper challenge #97 on SCS. I cased this card. Since it was a sketch challenge, I changed the sketch to Taylor's sketch for this week. I also changed the color scheme, the vertical crimping to horizontal scoring, and the pearls to brads. I added ribbon, paper piercing and a scalloped edge!
I realized when I was finished that this card is red, green & gold (probably because that was what was out on my desk from the stocking card). So this meets the challenge for the ladies at Stamp Something.
Here are the details for the cards (Stocking card, Snowy tree card and Poinsettia card):
Stamps: Stocking of Elegance (Unity), All Year Cheer III
Paper: Very Vanilla, Wild Wasabi, BG Urban Prairie
Ink: Versamark, Real Red, Wild Wasabi
Accessories: Gold ep, heat tool, scallop edge punch, blender pen, stampin' dimensionals
Techniques: embossing
Stamps: Trinity Trio (Unity), Short & Sweet (SU)
Paper: Whisper White, Chocolate Chip, BG Mistletoe & Pear
Ink: StazOn Jet Black, Chocolate Chip, Certainly Celery, Tempting Turquoise
Accessories: Chocolate Chip grosgrain, corner rounder, MAMBI & Michael's self adhesive rhinestones, Glistening Snow Writer, stampin' dimensionals, blender pen
Stamps: Tiny Trinity
Paper: Very Vanilla, Riding Hood Red, Wild Wasabi
Ink: Versamark
Accessories: Clear ep, heat tool, corner punch, mat pack, paper piercing tool, Michael's gold ribbon, MM gold brads, glue dots, stampin' dimensionals, scallop edge punch, Join in the Cheer die cut, Big shot
Techniques: paper piercing
All products used are Stampin' Up! unless otherwise noted.
So during nap time and cartoons, I got this card done! I got some new Unity and had to ink it up! I made this card for Jennifer Buck's quick card challenge for the Stamp Simply Celebration '08! Making it quick means using Julee Tilman's sketch and using some designer paper. My quick card took a little longer when I tried to incorporate some gold for the Stamp Something red, gold and green challenge. Embossing added time, but it was well worth it!
Looking back now, my scalloped edge layer needed a little something more. Oh well!
I used some new Unity here too! This one is called Trinity Trio. I used another sketch on this one! The sketch is the Six Chicks Sketch and Product Challenge #10. Mandy from Limelight Papercrafts posted it here. This card is pretty self explanatory, except for the color. I was trying to match the blue-green color in the dp, so I scribbled on some cellophane with my Tempting Turquoise and Certainly Celery. I mixed them up with a blender pen and colored my trees that way. Overall, I like it! I still need lots of work on my coloring skills. I think that is a strong deficit of mine. Any tips? Please let me know! I never took any art classes, I was always too busy with music:(
In retrospect, I should have stamped the trees with Timber Brown StazOn, but I don't think it is really noticeable.
This last card took quite a long time! I had to be upstairs anyway. Sweet Pea has a cold now and wasn't sleeping very well. She kept waking up and I had to go in and help her calm down and get back to sleep. It even happened two more times after dh and I went to bed!
I began this card for the Featured Stamper challenge #97 on SCS. I cased this card. Since it was a sketch challenge, I changed the sketch to Taylor's sketch for this week. I also changed the color scheme, the vertical crimping to horizontal scoring, and the pearls to brads. I added ribbon, paper piercing and a scalloped edge!
I realized when I was finished that this card is red, green & gold (probably because that was what was out on my desk from the stocking card). So this meets the challenge for the ladies at Stamp Something.
Here are the details for the cards (Stocking card, Snowy tree card and Poinsettia card):
Stamps: Stocking of Elegance (Unity), All Year Cheer III
Paper: Very Vanilla, Wild Wasabi, BG Urban Prairie
Ink: Versamark, Real Red, Wild Wasabi
Accessories: Gold ep, heat tool, scallop edge punch, blender pen, stampin' dimensionals
Techniques: embossing
Stamps: Trinity Trio (Unity), Short & Sweet (SU)
Paper: Whisper White, Chocolate Chip, BG Mistletoe & Pear
Ink: StazOn Jet Black, Chocolate Chip, Certainly Celery, Tempting Turquoise
Accessories: Chocolate Chip grosgrain, corner rounder, MAMBI & Michael's self adhesive rhinestones, Glistening Snow Writer, stampin' dimensionals, blender pen
Stamps: Tiny Trinity
Paper: Very Vanilla, Riding Hood Red, Wild Wasabi
Ink: Versamark
Accessories: Clear ep, heat tool, corner punch, mat pack, paper piercing tool, Michael's gold ribbon, MM gold brads, glue dots, stampin' dimensionals, scallop edge punch, Join in the Cheer die cut, Big shot
Techniques: paper piercing
All products used are Stampin' Up! unless otherwise noted.
Thursday, December 11, 2008
Stamp Simply Celebrates a Mass Card Production!
I took some cards to work last week and one of my co-workers liked a card I had in my basket that she asked if I could make 10 more of them. Coincidentally, Tammy Hershberger issued this challenge and used a card she had received as inspiration. (This challenge is part of Stamp Simply Celebration '08). I figured that I would make the cards for my co-worker based of the card she had seen. It probably took me 1 1/2 hours to make 10 cards. It's hard for me calculate exactly as I did it over the course of a few days when I had bits and pieces of time.
Here is the card I cased! I changed very little, but only because I thought it was adorable. I used a sentiment from a different set. I stamped my trees in green, not white. I used grosgrain ribbon, not satin. I used sage, not wasabi. I used confetti white, not white. I added a star brad on top of one of the trees. I think that the star brad really makes the card!
Here are the details for these cards:
Stamps: Loads of Love, Itty Bitty Backgrounds
Paper: Confetti White, Sage Shadow, Vellum
Ink: Garden Green, White Craft
Accessories: White grosgrain ribbon, mm star brads
Techniques: tearing
All products are Stampin' Up! unless otherwise posted.
Saturday, December 6, 2008
Stamp Simply Celebration!!!
I created this little box for Janine Orchard's challenge. She is hosting a Cookie Recipe Exchange. Where does the stamping come in? You get to decorate your own bag or box. So I stamped this tiny take out box and put it together. It holds about four of my favorite Christmas time cookie: Eskimo Cookies. They are a fun no-bake cookie that my Mom made with my sister and me since the time we were old enough to count and help measure ingredients!
This is what they look like. They are powdered sugar covered ball. I cut one in half so you could see the yummy chocolate and oatmeal goodness inside!
Here is the recipe for my Eskimo Cookies (makes 3 dozen):
3/4 c. butter, softened
3/4 c. sugar
1 T. water
1/2 t. vanilla
3 T. cocoa
2 c. Quaker quick oats (instant oatmeal)
powdered sugar
Beat the softened butter in a large bowl. Add the sugar and beat well. Mix in water, vanilla and cocoa. Next add oatmeal and mix in. Refrigerate overnight. Shape into 36 balls and roll in powdered sugar. Keep cookies in the refrigerator.
Yum!
Here are the details for my Tiny Take Out Box:
Stamps: Paint Prints, Fresh Cuts
Paper: SU Tiny Take Out Box in Confetti White
Ink: Real Red, Old Olive, Bravo Burgundy
Accessories: Gold brads, gold cord
All products are Stampin' Up! unless otherwise noted.
Thursday, December 4, 2008
Thinking outside of the box...
on a couple of levels. By no means am I suggesting that these are original ideas. What I am saying is that this is the first time that it has occurred to me!
I made this card for Sketch Challenge 205 on SCS. I turned this flower image upside down to represent Christmas ornaments. I have been on an embossing kick lately, so I embossed it in silver. I felt like I was cutting the panels a little thin, but it worked out. I was going to tie a ribbon around the whole thing, but then thought of stringing a thin ribbon through the ornaments like they were hanging from it. I used a very small hole punch and then cut my ribbon to a very thin point to thread it through. I left my ribbon on the roll because I wasn't sure how much I would need. It was a good thing because I had to re-cut the end to a thin point several times as it frayed easily.
Here are the details for this card:
Stamps: Lots of Thoughts, Humble Bloom (Unity)
Paper: Night of Navy, Whisper White
Ink: Versamark
Accessories: Silver ep, heat tool, 1/16 circle punch, Offray thin satin navy ribbon, stampin' dimensionals
Techniques: embossing
All products are Stampin' Up! unless otherwise noted.
Look out...Double Embossing!
I can't tell you how much I enjoy and learn from Sharon Johnson and her blog, No Time to Stamp? I first learned of this technique from her. She explained a couple of ways to do this, but I just stamped my whole image in Versamark and then sprinkled on the black ep and then the silver ep. It looks quite technical, but really wasn't.
I made the card for the Featured Stamper 95 on SCS. My card is based VERY loosely off of this card. I noticed that Dawn, the featured stamper, tied quite a few ribbons across the tops of her cards and that often she left quite a bit of wide open space on her cards or used large layers. (See, I told you it was loosely based!)
I made a few changes. Here are the changes I made. I only used one layer of card stock. I layered my ribbons (organdy, grosgrain, cord). I embossed instead of water coloring. I added a sentiment to my card. I used white, black and silver instead of green, red and white.
I seem to be on quite an embossing kick lately. I think that it has to do with the Holiday season. You know, everything is shiny and sparkly.
Here are the details for my card:
Stamps: Dream Tree (Unity), Sentiments O'Simple
Paper: Whisper White
Ink: Versamark, Basic Black
Accessories: Black ep, Silver Tinsel ep, heat tool, Black organdy ribbon, Black grosgrain ribbon, Silver cord
Techniques: double embossing
All products are Stampin' Up! unless otherwise posted.
Sunday, November 30, 2008
It's Beginning to Look a Lot Like Christmas....
I combined a bunch of challenges in this one little card! First off, I used Taylor's sketch for a starting point. Next, I wanted to incorporate WT 194 "Giving Thanks", which matched the Stamp Simply challenge to "give thanks". Finally, I chose some dp and remembered the OCC challenge to use a snowman or snowflake or both.
This card went together really fast! That sometimes happens for me when I incorporate so many challenges. Hopefully, I pulled it off well! I can only think of a couple of things on the card that may not be self explanatory. The starburst background behind the center snowflake was made using the scallop punch two times. The sparkle on the snowflake if from my Sakura Clear Star gel pen. I just colored in the white space left when I stamped the image!
Here are the specifics for my card:
Stamps: Joyous Snowfall (Unity) & Sentiments O'Simple (Unity)
Paper: Baja Breeze, Basic Black, Whisper White, BG Mistletoe & Pear
Ink: Baja Breeze
Accessories: MAMBI rhinestones, stampin' sponges, stampin' dimensionals, 1 3/8" circle punch, scallop punch, 1 3/8" square punch, Sakura Clear Star gel pen
Techniques: sponging
All products are Stampin' Up! unless otherwise noted.
Pinky Animal 3...What?
That was the title of the Limited Supplies Challenge on SCS from November 28th. I thought it would be a really easy challenge until I sat down to do it! Then all the stipulations of the challenge kept getting in my way! I created the bird embellishment earlier in the day and worked the rest of the card around it.
I didn't think that felt bird up completely on my own. I saw some fun stitched stars on Dawn McVey's blog. You can see her felt stars here.
A bonus part of the challenge was to include a number on the card. Try as I might, I just could not make it work with the limited number of layers and embellishments.
Here are the specifics for this card:
Stamps: Sentiments O'Simple (Unity)
Paper: Whisper White, Print Pack dp, Regal Rose
Ink: Regal Rose
Accessories: Felt, MM raspberry embroidery floss, mat pack, paper piercing tool, big shot, scallop circle #2
Techniques: faux stitching
All products are Stampin' Up! unless otherwise posted.
In Honor of Black Friday...
and a sketch offered up at the Limelight Papercraft Blog, here is my latest creation. I struggled and struggles to come up with something that wasn't the same card as many others did. The sketch just lent itself to a similar card design. I also wanted to keep the bookmark "black", meaning not so much color. The ladies at Stamp Something also issued a "black" challenge. You can check it out here.
I think I accomplished my goal. I used one of my favorite stamp sets and some Basic Grey designer paper. I am just loving all the Basic Grey that I have. A little bit of fun paper goes a long way toward dressing up any project. One thing I did that would not be noticeable from the photo is that I adhered the designer paper to Whisper White card stock to strengthen it!
Here are the details for this project:
Stamps: Art of Life
Paper: Basic Black, Whisper White, Going Gray, BG Scarlet's Letter
Ink: Going Gray, Basic Black
Accessories: MM black eyelet, crop-a-dile, thin satin white & black Offray ribbon
The Third Day of Christmas
The challenge for the 3rd day of Christmas on PCP was to make a card incorporating a hen, rooster or an owl. I used little baby chicks on my card because one day they will become hens! I really did want to stick with a Christmas theme, but how does one make chicks Christmas-y? And....I just purchased this cool Basic Grey paper and HAD to use it!
There wasn't much that was complicated about my card. I paper pieced the chicks. I used a gray watercolor crayon to "ground" the chicks. And...I cut my dp the wrong way the first time! What a goof! It just about killed me!
Here are the specifics for my card:
Stamps: Love You Much, Short & Sweet
Paper: Regal Rose, Basic Black, So Saffron, Whisper White, BG Urban Prairie
Ink: Basic Black, Regal Rose,
Accessories: Going Gray wcc, Blender Pen, Stampin' Dimensionals, Rose grosgrain ribbon, circle template
Techniques: paper piecing
All products are Stampin' Up! unless otherwise noted.
Saturday, November 29, 2008
Have you heard of Paper Craft Planet?
It's another on-line community for paper crafter's to communicate and share ideas. I have a gallery there, but have only submitted these two cards. I ran across some challenges while dh was rockin' out and Sweet Pea was sleeping! The challenges revolve around the Twelve Days of Christmas. The first challenge was to include a bird, a tree or both on your project!
The second challenge was to use a turtle or a dove on your card and to try and make it a holiday card in the spirit of the twelve days of Christmas.
When I finished these two cards, I realized that I had not done a lick of stamping on them. I just thought that was so weird! I don't know if I was just lazy or just really tired from my Black Friday shopping that began at 4:50 am!
Here are the details for the cards:
Holly and Berry card:
Paper: Garden Green, Riding Hood Red, Whisper White, BG Mistletoe & Pear
Accessories: Sheer White ribbon, LYB Christmas Sticker Tablet,stampin dimensionals, red glitter glue
Snowy Dove card:
Paper: Whisper White, Ski Slope dp, Baja Breeze
Ink: Baja Breeze
Accessories: mambi rhinestones, birds 'n blooms die cut, big shot, mm edge distresser, white satin ribbon from Michael's
Techniques: distressing
Incidentally, I won the Christmas stickers in the first card from Mandy at Limelight Papercrafts for this card submitted for a sketch challenge.
All products are Stampin' Up! unless otherwise posted.
Hip Hop Once More!
Since Hip Hop was on Wednesday this week, I was able to participate in the challenges that are issued that day. Wednesday was a half day at work for me and Sweet Pea went down for a nap after we got home. When my dh got home, he was supportive in allowing me time to finish up the second challenge. This first card was my response to challenge called "Get Stuffed with Unity", a food related challenge. I picked these wine glass and a bottle of wine because my family always has wine with Thanksgiving dinner. I also used last week's Sketch for You to Try. I didn't realize that the stand blocked the embellishments in the photo. What a goober I am!
Here are the details:
Stamps: Sentiments O' Simple (Unity), Good Times (Unity)
Paper: Bravo Burgundy, Basic Black, Whisper White, BG Eva
Ink: Bravo Burgundy, Pink Pirouette, Pale Plum
Accessories: Stampin' sponges, Black brads, Large oval punch, 1 1/4" circle punch, 1 3/8" circle punch, stampin' dimensionals
Techniques: sponging, direct to paper
This card is my response to the second challenge during Hip Hop called the "Turkey Dinner Color Challenge" in honor of turkey, cranberry sauce and mashed potatoes. For the design of this card I thought of Kristina Werner and imitated her clean and simple style. As far as I know, I did not copy any of her projects. If someone finds something substantially similar, do let me know and I will credit her properly. Of course, when I finished, I realized it qualified for the Limited Supply Challenge to use the chocolate as a color!
Here are the details for this card:
Stamps: Almighty God (Unity)
Paper: Very Vanilla, Chocolate Chip, Riding Hood Red, Ski Slope dp
Ink: Chocolate Chip
Accessories: Buttons, Linen thread, corner rounder, scallop edge punch
All products are Stampin' Up! unless otherwise posted.
Hip Hop Came Early This Week!
Unity Stamp Company runs a day long fest each week called Hip Hop Thursday! As last Thursday was Thanksgiving, Hip Hop was held on Wednesday. Need more information on Hip Hop Thursday, check here. They give out all kinds of prizes for all kinds of things. If you use Unity stamps to do any of the weekly challenges and then upload it to that week's thread, then you are eligible for additional prizes.
Well, I like prizes. So I used Unity on three weekly challenges and two of them are on this post. (See post titled Sweet Pea's book for the third weekly challenge). The first photo is from this week's Unity Addict Challenge and the meat of the challenge was to use red and white on a thank you card. These challenge cards are counted in with the other challenge cards eligible for additional prizes.
Here are the details for this card:
Stamps: Dream Tree (Unity) & Sentiments o' Simple (Unity)
Paper: Whisper White, Real Red
Ink: Encore Silver, Real Red
Accessories: lavender glitter (JoAnn's), silver rhinestones (Michael's), stampin' dimensionals, sticky strip, Birds 'n Blooms dies, big shot
This card is from Saturday's Inspiration Challenge (155)on SCS. Stampers were to be inspired by the women's fashion from the AMC original show, "Mad Men". My DH watches this show religiously! I also used Beate's Weekend Sketch to flesh out my card. I used this dress as inspiration for the challenge. When I showed my dh, he said it looked sensual. That's more of a response than I usually get.
Here are the details for this card:
Stamps: Sentiments o'Simple (Unity) & Distressed Dot Background (Unity)
Paper: Basic Black, Riding Hood Red, Whisper White, DCWV the stack III
Ink: Basic Gray, Riding Hood Red, Versamark
Accessories: Sheer Black ribbon (JoAnn's), clear ep, heat tool, stampin' dimensionals
Techniques: direct to paper
This card met the criteria for a couple of other challenges this week. Have I mentioned that I really like challenges? They keep me going! This one uses the sketch from Our Creative Corner and uses a pearl, as challenged in Ways To Use It 193. I flipped the sketch on its side to fit the images I wanted to use! I finally tried an embossing folder in my Big Shot! It was so simple to do for all the depth and dimension it provides on the card.
Here are the details on this card:
Stamps: Joyous Snowfall by Unity Stamp Company
Paper: Very Vanilla, Blush Blossom, Brushed Gold
Ink: Versamark, Encore gold
Accessories: gold ep, pretties kit pearl, glue dot, D'Vine CB folder, Very Vanilla taffeta ribbon, stampin' dimensionals, heat tool
Techniques: direct to paper
All products are Stampin' Up! unless otherwise posted.
Sweet Pea's book ;)
I made the mistake of telling her that this was her book and then she didn't want to give it back or let me put it in her daycare bag! I altered a composition book to use for communication about Sweet Pea's day between her daycare provider and I. .
I knew that I was running out of room in her old one, but just couldn't get my act together to alter a new one. So.....she had a Power Ranger on the front of her journal for a few days! I just couldn't stand that, so I busted out my Basic Grey patterned paper that came with adhesive letters and decorative stickers and went to work. Sweet Pea likes sparkles, so I added some with my Sakura Clear Star gel pen. Here journal goes in and out of her bag a couple times a day, so I didn't want anything to stick up or it would like get worn or torn.
I met the parameters for two challenges on this piece. The Limited Supply Challenge 195 (which wasn't so limited) was to use chocolate (colored) anything. Verve's challenge this month is to do anything but a card!
Things that I did on the project that may not be obvious from the photo are the outlining of the adhesive letters to get them to stand out more and the sponging of ink on the pink paper on the spine and the image panel to create a more worn or aged look. I felt like this look matched the distress look of the patterned paper best.
Stamps: Well Wisher from Unity's Buzzin' Around
Paper: BG Sugared, Chocolate Chip, Pink Pirouette
Ink: StazOn Timber Brown, River Rock, Craft White, Bravo Burgundy, Real Red, Old Olive
Accessories: BG Sugared stickers, Chocolate Chip grosgrain ribbon, Sakura Clear Star gel pen, blender pen, stampin' sponges
Techniques: distressing
All products are Stampin' Up! unless otherwise posted.
Friday, November 28, 2008
Black Friday Deals & More...
So I went shopping today! Yeah, it was a little nutty. Sweet Pea woke me up at 3:40a.m. I couldn't get back to sleep so I left the house at 4:25 a.m. I had my purchases in hand at 5:00 a.m. and waited two (yes, 2) hours to pay for them! Lines got much shorter after that!
I found some cool blog candy giveaways for Black Friday! You should see this Glittering Tulip Chandelier!OH-MY-WORD!!! I visit Kristina Werner's blog often and she was talking up her friend, Patti. So I went to visit her blog, so glad I did! See here what kind of cool stuff Patti does! Oh yeah, and while you are at it, go to this post too!
The unfortunate part of my Black Friday is that I didn't have any suggestions for the family members that Sweet Pea and I drew after Thanksgiving dinner. I guess I will have to go shopping again. Maybe I will go later this weekend!
Sunday, November 16, 2008
Isabel Turns Three!
Sweet Pea and I are off to a birthday party today! It will be a fun time doing gymnastics! Isabel is the birthday girl and goes to daycare with SweetPea. So many of the other mother's know that I make cards that I would not be able to get away with a quick store bought card to save time! So instead, Sweet Pea and I had war while I tried to make her little friend's birthday card.
I took my inspiration from this week's OCCC inspiration challenge and also squeezed in the Ways to Use it Challenge for this week. WT191 was about putting your corner punches to use!
Here are the details for this card:
Stamps: Sentiments O'Simple by Unity Stamp Company, So Many Scallops
Paper: Piroutte Pink, Whisper White & Bella Rose dp
Ink: Pretty in Pink, Pink Pirouette
Accessories: Corner rounder, Pink organdy ribbon, stampin' dimensionals, scallop punch, 1 1/4" circle punch, 1" circle punch, Sakura Clear Star gel pen, sponge dauber
Techniques: sponging
All products are Stampin' Up! unless otherwise posted.
Verve Holiday Sketch Blitz #5
Here is my fifth and final card for the Verve Holiday Sketch Blitz. I chose colors and images that just said "Verve" to me! I dug into my dp stash to find this one with the "Verve" colors. I had a lot of fun with this one and really love how my card turned out.
Dazzling Diamonds get everywhere! They are really not on the sentiment panel like it shows in the picture. They were only there when I took the photo and the light caught them! They are quite shimmery! The shimmer on the butterfly trail is from the Sakura Clear Star gel pen. Oh boy, do I love that thing! I am so glad that I got two.
Here are the details for this card:
Stamps: Fluttering By (Verve)
Paper: Baja Breeze, Close to Cocoa, Granny's Kitchen dp by SEI
Ink: Baja Breeze, Close to Cocoa, Chocolate Chip
Accessories: Chocolate grosgrain ribbon, hole punch, Sakura Clear Star gel pen, glue dots, two way glue pen, Dazzling Diamonds
All products are Stampin' Up! unless otherwise posted.
Verve Holiday Sketch Blitz #4
Here is the card that I cooked up for the 4th sketch in the Verve Holiday Sketch Blitz. While I have been loving my new Verve stamps, I need to have a little variety. So I pulled out a great set I have called Natural Beauty. I recently read an inspiring blog entry by Christi Snow, so I tried water coloring. My coloring needs work and I think that just means practice. So practice I did.
I also had this stamp that looks like a zig-zag stitch laying around collecting dust, so I used it. The sketch included something that looked like stitching and my sewing machine is buried! (Sorry Mom, I am getting there!)
Here are the details for this card:
Stamps: Natural Beauty, Fluttering By by Verve, Stitched Ribbon by Hero Arts
Paper: Whisper White, Basic Black, PC fascination dp
Ink: StazOn Jet Black
Accessories: Watercolor pencils, aquapainter, Black organdy from Michael's
Techniques: Water coloring
All products are Stampin' Up! unless otherwise posted.
Verve Holiday Sketch Blitz #3
Here is my take on the 3rd sketch in the Verve Holiday Sketch Blitz. I used my new Verve sets that I won when I was selected as the winner for the project parade. The card that won for me was the birthday card I made for my nephew. Thanks Travis ;)!!!
I can't remember why I was digging around in the bins in my craft room, but I was. I usually just use what is laying around on top of the pile. I have so much stuff (Don't tell my husband), that I had forgotten about two thirds of it. I found this cool dp and so card stock to match it! It is so soft and subtle, perfect for the message on this card.
This card gave me fits, when I came to the pearls on the cross. I'm not sure why, but I think I learned something! Always put the pearls on last!
Here are the details:
Stamps: Notes of Prayer by Verve Stamps
Paper: Random Pale Green cs in my drawer, PC Slab V, Sahara Sand, Whisper White
Ink: Colorbox Amber Satin
Accessories: Ice Green Kaisercraft pearls, scallop edge punch, thin white satin ribbon by Offray, stampin' dimensionals
All products are Stampin' Up! unless otherwise posted.
Thursday, November 6, 2008
Verve Holiday Sketch Blitz #2
Here is my submission for the 2nd sketch in the Verve Holiday Sketch Blitz. I just love my new Verve Stamps and Julee Tilman's sketches. These both make stamping a snap!!! Nothing too tricky with this card. I don't know if the photo shows the sponging around the edge of the circle where the sentiment is. Upon reflection, I probably should have sponged the edges of the image panel as well. Maybe next time. The other thing I did that wouldn't be immediately obvious is that I colored the clear rhinestones with colored Sharpies. I am loving that little trick. It makes it really easy to customize your bling!
Here are the details for this card:
Stamps: Fluttering By (Verve)
Paper: Whisper White, Basic Gray, Basic Grey Two Scoops
Ink: Basic Gray, Baja Breeze, Wild Wasabi
Accessories: MAMBI rhinestones, 1" circle punch, 1 1/4" circle punch, 1/8" circle punch, Offray white satin ribbon, blender pen, sponge daubers, turquoise & olive Sharpies, stampin' dimensionals
Techniques: sponging
All products are Stampin' Up! unless otherwise posted.
Just like Becca
I created this card for the Featured Stamper Challenge 91 on SCS. Here the card that I cased. I chose it because I liked the colors and the tree image that she used! I found some similarly colored dp in my stash and (lucky me) it matched some of the In Colors from SU!
This wasn't a very technical card. Pretty easy really. The only thing to note is that I colored the heart on the tree trunk with my white gel pen and then added dots around the edge of the Baja Breeze layer.
Otherwise, here are the details:
Stamps: Dream Tree, Sentiments O'Simple by Unity Stamp Company
Paper: Kiwi Kiss, Baja Breeze, PC Rob & Bob Studio dp
Ink: StazOn Jet Black
Accessories: white gel pen, 1/8" circle punch, Offray white satin ribbon, corner rounder
All products are Stampin' Up!, unless noted.
JOY votive candle holder
I created this votive candle holder for the SCS Color Challenge 191 to use Kiwi Kiss, Pretty in Pink and Riding Hood Red. I wanted my main focus to be the snowflakes, so I embossed them in white! Before I did that, I stamped the multicolor pattern on the opposite side of the vellum. I wrapped my vellum around my votive holder and secured it with mini glue dots (because I couldn't find my hot glue gun!). Finally, I tied a thin pink ribbon around the top and stressed out over the bow!
Stamps: Distressed Dot Background, Joyous Snowfall by Unity Stamp Company
Paper: Vellum
Ink: Riding Hood Red, Kiwi Kiss, Pretty in Pink, Craft White
Accessories: clear ep, heat tool, pink ribbon, mini glue dots
Techniques: embossing
All products are Stampin' Up! unless otherwise posted.
Stamps: Distressed Dot Background, Joyous Snowfall by Unity Stamp Company
Paper: Vellum
Ink: Riding Hood Red, Kiwi Kiss, Pretty in Pink, Craft White
Accessories: clear ep, heat tool, pink ribbon, mini glue dots
Techniques: embossing
All products are Stampin' Up! unless otherwise posted.
Another Unity Card and Another Unity Case
Jennifer Buck is one of my stamping idols! This card of hers got me hooked! I had read her blog faithfully ever since! So it was a no-brainer when I read about the Limited Supply Challenge 192 to use stamps in disguise, that I recalled this card Ms. Buck made. Well, I would show you, but it is nowhere to be found. My guess is that it has been removed for publication! Go figure!
The only little how-to is the ribbon. I used my craft knife to cut a tiny little slit in the white layer to thread my ribbon through. Then I tied a knot and moved the knot down to cover the slit. Here are the rest of the details for this card:
Stamps: Tiny Trinity, Sentiments o'Simple
Paper: Real Red, Whisper White
Ink: StazOn Jet Black, Real Red marker, Old Olive marker
Accessories: craft knife, scallop edge punch, Red offray ribbon
All products used are Stampin' Up! unless otherwise posted.
Verve Holiday Sketch Blitz #1
If you don't know Verve, you need to check the company out! Last month, I won their October Challenge. Okay, I was randomly picked again, but a picture of my card was posted on their website. Anyhow, my prize was a little spending spree with them! I chose two stamp sets and recently received them. The stamps are really quite wonderful. I usually like clear rubber for the clarity of image. These clear stamps from Verve create clean images and you can see exactly where you are stamping (no need for a SAMJ!).
Lucky me, my stamps arrived just in time to participate in the Verve Holiday Sketch Blitz!!! And if you know me, my favorite kind of challenge is a sketch challenge. I only tweaked the sketch a little to fit the cross.
So here are the details for this card:
Stamps: Notes of Prayer by Verve stamps
Paper: Very Vanilla, Brushed Gold, Basic Grey Sugared
Ink: Encore Gold, Versamark
Accessories: Gold ep, vanilla taffeta ribbon, mini glue dot, stampin' dimensionals, heat tool
Techniques: embossing
I liked how my card turned out so well, that I made another one. Only this time I gave a little love to my new Unity stamp that I won (Guess I am kind of lucky!) from Chelsea Cook in a blog candy give away. While I was at it, I used the cracked glass technique for the Ways to Use It 190 challenge on SCS.
This card is pretty simple. The only thing that may not be immediately obvious is that I colored some rhinestones with a Dandelion? colored Sharpie to get the yellow-gold glow! I just love the dp, it really makes the card. These two (actually three) went super quick!
Here are the specifics related to this card:
Stamps: Almighty God by Unity Stamp Company
Paper: Very Vanilla, Brushed Gold, Basic Grey Sugared
Ink: Old Olive, Versamark
Accessories: Vanilla Taffeta ribbon, UTEE, heat tool, me & my big idea rhinestones, Dandelion sharpie, mini glue dots, stampin' dimensionals
Techniques: embossing
All products are Stampin' Up! unless otherwise posted.
Tuesday, November 4, 2008
Trying a New Technique
Julee Tilman of Verve Stamps put forward a challenge through Our Creative Corner to try the Vintage Values technique. I didn't get time to actually try the technique before the timeline ran out on the challenge, but I still completed it anyway. I have been looking to improve my skills with a sponge!
This is a pretty simple card. I provided a link to the sponging technique and I couldn't write it up better than it is. The only other "trick" on the card is the clear rhinestones (you know, the ones that look like faux diamonds) that I colored black with a Sharpie!
Stamps: The Art of Life, All Night Media Anna Griffin Sentiments
Paper: River Rock, Basic Black, Provo Craft Heritage Post dp
Ink: River Rock, Kiwi Kiss, Old Olive, Basic Black
Accessories: me & my big idea rhinestone singles, black sharpie, Theater Ribbon Originals
Techniques: Vintage Values, sponging
All products are Stampin' Up! unless otherwise posted.
Six Chicks Sketch!!!
This little baby netted me some more blog candy! Mandy at Limelight Papercrafts offered up a LYB Christmas Sticker Tablet for the winner of the sketch challenge. Okay, so it was random! A girl has to start somewhere and exposure is good!
This card is pretty straight forward. The only thing that may not be apparent is that I sponged the edges of my circles with Wild Wasabi ink lightly and then edged (direct to paper) the circles with Wild Wasabi.
Stamps: Changito Santa by Stampendous, Short & Sweet
Paper: Wild Wasabi, Basic Grey Two Scoops
Ink: StazOn Jet Black, Real Red,
Accessories: WCC, Blender pens, white organdy ribbon, stampin' dimensionals, circle stencil, 1 1/4" circle punch, sponge daubers, Star Dust stickles
Techniques: sponging
All products are Stampin' Up! unless otherwise noted.
Thursday, October 30, 2008
Look at that Sparkle!
Well, I won some blog candy and got myself a Sakura Clear Star gel pen and oh my, is it fun! In the picture, it looks kind of copper colored, but irl it totally sparkles!
I'm so into Unity and Hip Hop Thursdays that I made this card for Thursday's Ways To Use It 189. Some of Unity's stamps are quite large and one will do it! The word bloom is quite big and I felt like I could easily make it the focal point of the card. Unless the Sakura Clear Star gel pen is stealing the card's thunder (tee hee)!
Stamps: Humble Bloom by Unity Stamp Company
Paper: Pink Pirouette, Very Vanilla, Creamy Caramel, Chocolate Chip
Ink: Creamy Caramel, Pink Pirouette, Pretty in Pink, Certainly Celery, Sakura Clear Star Gel pen
Accessories: American Crafts Uptown Khaki ribbon, stampin' dimensionals, corner rounder
All products used are Stampin' Up! unless otherwise posted.
Hope for the Cure
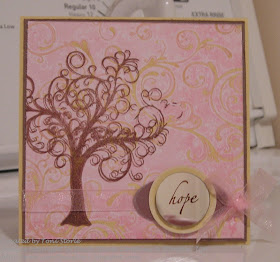
I am so pleased about how this card turned out. My biggest fear was that the mirror would be too heavy for the card. As it turns out, it is not too heavy. After I made it and photographed it, the mirror sagged (still attached to the ribbon, but not to the card stock) so I bolstered my adhesive. That is a minor price to pay for using a mirror as an embellishment.
The Unity Wednesday Challenge for this week revolved around hope.
H - My sentiment is "hope"
O - I put pink organdy ribbon ON my card.
P - I used dp with Pink in it.
E - I used a mirror for my embellishment that starts with M (mammogram)
One little detail that may not be obvious from just looking is how I distressed the circle and oval behind my mirror. It looked to clean when I pieced them together, so I edged the circle and oval with white craft ink and then smeared it with my finger (okay...and a old sock from the rag bag)!
Here are the details for this card:
Stamps: Autumn Leaf Prints, Dream Tree by Unity Stamp Company
Paper: So Saffron, Close to Cocoa, Basic Grey Two Scoops
Ink: Close to Cocoa, Timber Brown StazOn, White Craft Ink
Accessories: Mirror, Pink Organdy ribbon, 1 1/4" circle punch, Large oval punch, glue dots, MM distressing tool
Techniques: Distressing
All products are Stampin' Up! unless otherwise posted.
For Shane
My daycare provider's husband in back from Iraq and about to fly in for North Carolina. When I found the fancy napkin at work, I decided to try the paper napkin transfer technique. It's patriotic theme fits perfectly with my need for a card to thank Shane for his service to our country.
See SCS TLC192 for a description of the technique. The only other details about what I did have to do with the stars. I cut out the stars from the napkin to use as embellishments.
Here are the rest of the details:
Stamps: Sentiments O'Simple by Unity Stamp Company.
Paper: Sahara Sand, Real Red, Brilliant Blue, Whisper White
Ink: Basic Gray
Accessories: Decorative napkin, freezer paper, iron, stencil, stampin' dimensionals
Techniques: Paper Napkin Transfer
All products are Stampin' Up! unless otherwise posted.
Monday, October 27, 2008
Lots of Work!!!
Do you ever get in a mood where you just have to get it right? Well, I was in one when I made this. It took forever! I fiddle with what to put on each layer, which color to use and what images and embellishments to use and where!
I incorporated 4 different challenges here. First, I used SCS sketch challenge 199. There were two sketches for 199 and I had to decide which one to use. Then came Kristina Werner's Color Inspiration #27 to use red or pink as a main color, in combination with the fact that October is Breast Cancer Awareness month. On SCS a challenge was issued to incorporate pink into all you cards during the month of October. For the month of October, Verve issued a challenge to emboss! Finally, I worked on a recipe challenge for Unity Challenge Wednesday. The challenge was to use something clear (like a button, acetate/transparency, ghost shape, even Crystal Effects), use some ribbon, and to use something from your latest Unity order.
My embossing is on the largest glittery layer. I stamped the dot background in Versamark, applied Heat & Stick powder and heated. Right away I applied Dazzling Diamonds and reheated to activate my heat and stick powder.
Here are the rest of the details:
Stamps: Short & Sweet, Joyous Snowfall & Distressed Dot background by Unity Stamp Co.
Paper: Very Vanilla, Pirouette Pink, Pretty in Pink
Ink: Pirouette Pink, Versamark
Accessories: Heat & stick powder, heat tool , Dazzling Diamonds, Vanilla Taffeta Ribbon, Pink Organza Ribbon, Offray pink ribbon, mini glue dots, clear button, 1 3/8" circle punch, scallop punch, stampin' sponge, two way glue pen
Techniques: sponging, embossing
All products are Stampin'Up! unless otherwise posted.
Monday, October 20, 2008
Danya Comes Through!
I'm not sure that anyone loves their daycard provider as much as me(except for the parents of the other girls at daycare)! Sweet Pea has been staying at Danya's since June of last year. Danya is wonderful! She takes the kids places, celebrates special events (like going away, moving on to Kindergarten, holidays, using the potty and birthdays), and does fun arts and crafts. I could go on forever!
Recently, I was complaining that the hubby changed his fishing/camping plans without telling me and left me high and dry for one time a month girls night! This was particularly painful because the girls were planning on going out to a nice lounge and listening to a blues band. Something I could really only do with the girls as my hubby just wouldn't be into it! Danya said, "Why don't you just let Sweet Pea spend the night here?". I tell you that woman is worth every penny and then some!
So Sweet Pea spent the night and had a fabulous time. She didn't want to come home the next morning and Danya had to remind her that she would be back the next day! After Pea's nap, I had her help me make a thank you card for Danya. I had been browsing some other cards on SCS and spotted this one and decided to borrow the concept. I also used the criteria from LSC190 and a sketch challenge posted by the wonderful ladies at Our Creative Corner.
I stamped the bird image on a piece of Whisper White card stock and should have stamped the sentiment too (lesson learned). I then let Sweet Pea go at it with her crayons. It was tough to make her colors choices work into the card as a whole (another lesson learned). I cut the focal image panel out and also cut out a background panel from the scribbled card stock. On the second background panel, I tried to repeat Pea's color choices. It ended up looking really busy to me.
Of course, Danya loved and said she would like to have a couple more for herself! See what I mean about this woman!
Here are the specifics on the card:
Stamps: Zoofari, Upsy Daisy, Distress Dot Background
Paper: Cameo Coral, Yo Yo Yellow, Whisper White, Crayola Designs by Sweet Pea (just kidding!)
Ink: StazOn Black, Bordering Blue, Only Orange, Yo Yo Yellow, Orchid Opulence
Accessories: Crayola Crayons, Black MM eyelet, Sheer white ribbon
Difficulty (1-Easy 5-Advanced): 2
All products are Stampin' Up! unless otherwise posted.
Stay Off the Roads!!!
So my nephew is turning 16 on Wednesday and I needed a card to put some gas money in!!! I'm certain that he will be a good driver, but I am supposed to warn everyone. He's a great kid and just represented his class at school as Homecoming Royalty. My poor sister is feeling old!
For this card, I tried to encompass a few challenges. I used a sketch provided by Limelight Papercrafts and the emboss resist technique for Verve's October Challenge to emboss something. Finally, I cased this card from Sunday's Featured Stamper Challenge.
I created my mask first by measuring a cutting a scrap piece of card stock to the same dimensions of the Vanilla card stock I used for my focal images. I then punched the three squares as evenly as I could. I laid down my mask on the Vanilla card stock and adhered it with temporary adhesive. Next I stamped my acorn image in Versamark and embossed with clear ep. Then I sponged the a different color ink over each embossed acorn.
I was planning on putting brads under the More Mustard strip of card stock to set off the sentiment. I just couldn't put them through the Vanilla to show on the inside. I know my nephew wouldn't card, but I would. So instead, I grabbed my mat pack and colored in three circles with my blender pen and an ink pad.
Here are the specifics on this card:
Stamps: Birthday Whimsy, Acorn stamp by Unity Stamp Company
Paper: Very Vanilla, Close to Cocoa dp, Close to Cocoa, More Mustard
Ink: Close to Cocoa, Creamy Caramel, More Mustard, Versamark
Accessories: Clear ep, 1 1/4" square punch, heat tool, mat pack, MM distressing tool, stampin' dimensionals
Techniques: Masking, emboss resist, distressing
Sunday, October 19, 2008
Dream Tree Strikes Again!
This one turned out a little bit plain, but I still like it! I wonder if I would like it more if I had embossed it with clear ep like I had originally planned. I overruled that thought because I felt like I have been embossing everything. Anyway, this is a card for the SCS Inspiration Challenge from yesterday.
I chose the colors from one specific pillow and the elements used on the card came from several other pillows that were posted on the artists site. I used the paper piercing because I needed something else and it seemed to fit with the stitching that would be necessary to create the pillow.
This one isn't too complicated. I stamped the bird first, masked him off and then stamped the tree!
Here are the details:
Stamps: Wild About You, Autumn Leaf Prints, Dream Tree by Unity Stamp Company
Paper: Very Vanilla, Close to Cocoa, Soft Sky
Ink: Close to Cocoa
Accessories: Mat Pack, Paper Piercing Tool
Techniques: Masking
All products are Stampin' Up! unless otherwise posted.
Thursday, October 16, 2008
The Color and The Sketch
Doesn't that remind you of a song title? Well, it does me. I wanted to try this SCS Sketch Challenge and then just decided to use these colors again because I like them! I altered the sketch a bit from the original. I moved my half circle and circle to the right from the center!
If I had thought that my ornament card was tough because I don't have Nesties, this one was really tough! Then I complicated things by putting my ribbon under my top circle, but above the rectangle and half circle panels! Oh yeah, and I forgot how difficult it can be to tie two ribbons together neatly. Of course, it was super late because I was really into it and didn't want to give up!
The top of my card looked empty, so I added a little bling up there!
Here are the specifics for this card:
Stamps: Have a Diva Day by Unity Stamp Company
Paper: Basic Black, Whisper White, Pink Pirouette
Ink: Basic Black, Pink Pirouette
Accessories: Sheer Black and pink ribbon, stampin' dimensionals, glue dot, me & my big idea rhinestone singles, SAMJ
All products are Stampin' Up! unless otherwise posted.
For my man!!!
I made this card for Unity Challenge Wednesday. Wednesday night at my house is band practice. So after I put the Pea to bed, I work on cards. I was out of coffee (gasp!!!) and so I made some tea, but didn't have enough milk. I threw my coat on over my jammies and went out to face the band! As I pull open the refrigerator in the shop and reach for a gallon of milk, one of DH's band members said, "Sorry Toni, we drank all of your beer!". The light bulb went on, I graciously accepted his apology (as he knows full well that I am not a beer drinker), I went into the house, made my tea and shot up to my craft room to start the card.
The task was to create a masculine card and I think I did it! At least, my dh liked it and he picked out the background colors and approved the brads. We agreed that it shouldn't have ribbon on it, but I went ahead with the linen thread because I felt like it needed something to balance it out!
I embossed the (wine) bottle with Versamark, Classic Chocolate Chip ink, and clear ep. I sponged a lot of Creamy Caramel on the edges of the bar tab panel, the image panel and the edges of the dp on the base! Mostly, I did it for interest! You can't really get all kinds of foofy on a man's card!
Here are the details for this card:
Stamps: Rough Edges Alphabet, Good Times by Unity Stamp Company
Paper: Very Vanilla, Chocolate Chip, PC Rob and Bob Studio
Ink: Versamark, Chocolate Chip, Creamy Caramel
Accessories: Linen Thread, brads, clear ep, heat tool, stampin' dimensionals, stampin' sponges
Techniques: embossing, sponging, distressing
Wednesday, October 15, 2008
Basic Pirouettes
If you know me well, then you know that I love a good game! The SCS challenges are that for me. It isn't that you win or lose anything, but it is just fun to play! The challenges also get me in my craft room and that is a good thing!
This card is based on the colors from CC188 which included Basic Black, Whisper White and Pink Pirouette. I wanted to use some of my cool new Bella Rose DP, but I just couldn't make it work. So instead, I embossed the flower image on vellum and adhered it to the black card stock. When I finished the card, it reminded me of chalk boards (Does anyone still know what those are?) I repeated the colors and layer in the tag sans the vellum. My sentiment was an old Making Memories rub-on that I had hacking around my craft room!
I felt kind of tricky about how I hid my glue dots on the vellum. I put two behind the embossed white image on the bottom and covered up the two on the top with the ribbon!
Here are the details for this card:
Stamps: Humble Bloom by Unity Stamp Company
Paper: Pirouette Pink, Basic Black, Vellum
Ink: Craft White
Accessories: Clear ep, heat tool, White Offray ribbon, 1/8" circle punch, large oval punch, small oval punch, MM spring rub-ons, mini glue dots
Techniques: embossing
All products are Stampin' Up! unless otherwise posted.
Monday, October 13, 2008
Featured Ornament
I just love the way that this card turned out. The seed for this card was a challenge posted by Our Creative Corner to make an other-than-square/rectangle-card. I thought that I would do a circle shaped card and then began paging through the Featured Stamper, Anne Ryan, gallery for this week. I spotted this card and had a great idea! I decided to make my card look like an ornament. I was sure this wasn't an original idea, but I also wasn't CASEing any specific card/sketch. I went to work on the card. I had to use a circle stencil because I don't happen to own any Nestabilities yet! I punched a strip of brushed gold card stock with a scallop edge punch and trimmed the rest of the paper to make it look like the top of an ornament. I embossed the design with gold ep on Versamark. I set an eyelet in the brushed gold card stock and tied some gold cord through it.
I stamped the sentiment on the inside of the card (something I rarely do) with my gold encore pad and called it good! There just wasn't a good place on the front of the card and I like the patter so much that I didn't want to cover it up!
Here are the rest of the specifics for this card:
Stamps: Growing in Unity Tree by Unity Stamp Company, All Year Cheer
Paper: Very Vanilla, Brushed Gold
Ink: Versamark, Encore Gold
Accessories: Gold ep, heat tool, crop-a-dile, gold eyelet, gold cord, scallop edge punch, circle template, paper snips
Techniques: embossing
All products are Stampin' Up! unless otherwise posted.