Pages

Monday, January 28, 2013

Friends and New Homes

Happy Monday and welcome to another Friends of Speedy TV challenge!  This week, in challenge number 57, we are making projects with a theme of new homes.  I went ahead and used the Mark's Finest Papers set called Tweet That for today's card.  I just couldn't pass up the perfect sentiment and piecing my bird house on a post!  I stamped, colored and cut both the birdhouse image and birdbath image.  I trimmed the birdbath strategically and added it to the bottom of the birdhouse.  Some torn paper strips, embossed vellum, rounded corners and sponging round out my card.
I used the current Retro Sketches design as my jumping off point.  I didn't follow the sketch exactly, but I am sure that you can see a few of the elements in my card. 
 
Let's not forget that Mark's Finest Papers offers a prize to one lucky participant.  This week Amaryllis Definition is up for grabs.  What a great set!  Here it is:
Thanks for stopping by and have a great week!
 
Details - Stamps: Tweet That (MFP); Paper: Favorite Natural (MFP), PC dp, Cosmo Cricket dp, vellum, GKD white; Ink: Tuxedo Black, Crumb Cake; Accessories: So Trendy M-Bossabilities, corner chomper, sponge dauber, Copic & Touch Twin Markers.

Sunday, January 27, 2013

A Scor-Pal and Simple Stories Basket

It's time for another Scor-Pal project.  This time, our friends at Simple Stories have supplied us with some fabulous product and are hopping along with us!  Be sure to check out all the featured projects on the Scor-Pal Blog and the Simple Stories Blog.  I have created a sweet little two handled basket* for you today!   
For this project, you will need:
  • One 9" x 9" piece of card stock or designer paper
  • Two 2 3/4" x 9" strips of card stock or designer paper
  • Scissors
  • Oval punch or die cut
  • Corner rounder
  • Hole punch
  • Four brads
  • Ruler
  • Pencil
  • Additional card stock or designer paper scraps
  • Embellishments
Begin with one side of your 9" x 9" designer paper, desired pattern side up, place securely against the top fence of your Scor-Pal.  Score at 3" and 9".  Here I have used a piece of the Simple Stories Documented Simple Basics Designer Cardstock called Damask/Flourish
 Turn your designer paper 90 degrees.  Score again at 3" and 6". 
Without moving your designer paper, score at 1", 2", 7" and 8" from the top fence to the horizontal score at 3".  Then turn your paper 180 degrees and repeats scores at 1", 2", 7" and 8" from the top fence to the horizontal score at 3".  
Cut on the 1", 2", 3", 6", 7" and 8" score lines from the edge of the designer paper to the 3" horizontal score lines on both top and bottom. 
 Trim the 3" center tabs into triangles.  Before I began cutting, I used a ruler and pencil to mark the center of the panel and cut from the pencil mark to the corner.
 Trim 1/4" off the second and third strips, counting in from the outside edge. 
 Burnish all of your score lines.
Begin assembling your basket base by securing the top strips together with some Scor-Tape.   
Then secure the strips together with Scor-Tape, slightly overlapping the first strips. 
Next, secure the thirds strips together with Scor-Tape.  You will slightly overlap the second set of strips. 
Finally, secure the triangle tab up against the side of the basket with Scor-Tape.  If you haven't already, complete the second side of the basket in the same fashion.  
Punch or die cut two oval shapes from card stock or designer paper.  Score then in half and apply Scor-Tape to the back side.  Trim the points of the triangles and adhere the ovals over the top to hide the intersections of the strips.
 Take your two 3/4" x 9" strips of paper and round the four corners on each strip.  Then punch a hole at each end of the strips.  These will become your basket handles.
 Punch holes in the basket sides and attach handles to the basket base. 
 Finally, embellish your new basket as desired.  I raided the Simple Stories Documented Fundamental Cardstock Stickers for the flourish, buttons and butterfly.  I used an anti-static pad to remove the stickiness from my butterfly and used dimensionals adhesive to pop it off of the basket side.  I widened the holes of the buttons and threaded a little gold thread to match my tag.   My tag was created from a piece of the Simple Stories Documented collection called Documented Flash Cards.  I trimmed out a framed journaling card with a lovely flourish on it.  I scored and folded it in half, stamped my sentiment, sponged the edges, punched a small hole and secured it to my basket with a bit of gold cording.
Thanks for joining me today for my tutorial.  Have a fabulous day!
 
*My basket tutorial is based on this basket tutorial by Rachel Ricks.
 
Details - Stamps: Welcome Poppies (MFP); Paper: Simple Stories Documented Simple Basics Designer Cardstock Damask/Flourish, Simple Stories Documented Fundamental Cardstock Stickers, Simple Stories Documented Designer Cardstock Documented Flash Cards; Ink: Crumb Cake, Early Espresso; Accessories: Scor-Pal, Scor-Tape, paper snips, corner rounder, wide oval punch, hole punch, brads, ruler, pencil, gold cording, dimensional adhesive. 

Monday, January 21, 2013

Scor-Pal and Simple Stories Week

Are all you crafty people ready for another fun cross promotional week between Scor-Pal and Simple Stories?  Me too!  I get to help kick it off this time around.  Check out my tutorial on the Scor-Pal blog for my main project.  Just below, you can see a little tiny peek at what I have on the company blog.  Don't forget to see what the Simple Stories Designers have created for you. 

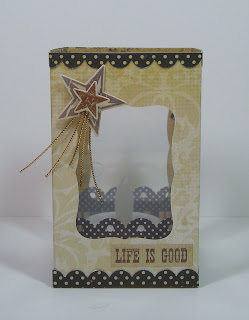
Since you are here, take a look at another project I made with the Simple Stories Documented Collection.  I made a Luminaria following the tutorial found on Splitcoaststampers.


For this project, you will need:
  • One 5 1/2" x 10 3/8" piece of card stock or patterned paper
  • Four 2 3/8" x 3 7/8" pieces of transparency, acetate or vellum
  • Scor-Pal
  • Scor-Tape
  • Die cutting tool
  • paper snips
  • Embellishments, as desired
Place the 10 3/8" side of the patterned paper (desired design up) against the top fence of your Scor-Pal. Score at 2 1/2", 5", 7 1/2" and 10".  I used a piece of Simple Stories Documented Simple Basics Designer Card Stock
Place the 5 1/2" side of the patterned paper against the top fence and score at 1 1/2".  
Burnish all of your folds.
Cut out the small rectangle on the bottom right hand side of the paper, as shown below.
Cut on the 2 1/2", 5" and 7 1/2" score lines up to the 1 1/2" horizontal score lines.  I like to trim mine on a bit of an angle.

Die cut windows into each panel.  By the way, the patterned paper I chose, Damask/Flourish, had a grid pattern on the back.
Line the edges of each panel with Scor-Tape.  
Remove the backing from the adhesive and adhere the transparency.  I used the Simple Stories Documented Transparency Photo Overlays for my windows. 

Line the 3/8" tab with Scor-Tape

Remove the backing from the adhesive and attach the sides for form a basic box shape.

Place two strips of Scor-Tape on the outside of two opposite tabs and attach them as shown below. 

Remove backing from the remaining three strips of Scor-Tape and adhere another tab down.


Place one strip of Scor-Tape on the inside of the remaining tab. 

Remove the backing from the adhesive and finish the bottom of the box.  Embellish as desired. 

I used a scalloped border punch to create the narrow scalloped edges at top and bottom with some matching Simple Stories Documented Designer Card Stock.  Then I added some Documented Fundamental Card Stock Stickers and a Documented Expression Card Stock Sticker.  I sandwiched some gold cording between two star stickers to create a fun embellishment.  Finally, you can light up your luminaria with a battery operated tea light. 


Thanks for stopping by today!  I hope you enjoyed the tutorial.  Be sure to stop by the Scor-Pal blog and the Simple Stories blog for more amazing projects all week long.
 
Details - Paper: Simple Stories Documented Designer Card Stock, Simple Stories Documented Simple Basics Designer Card Stock, Simple Stories Documented Transparency Photo Overlays; Accessories: Scor-Pal, Scor-Tape, Nestabilities, scallop edge punch, Simple Stories Fundamental Card Stock Stickers, Simple Stories Documented Expression Card Stock Stickers, gold cording, stampin' dimensionals. 

Friends and Creative Ribbon

Welcome to Monday and another Friends of Speedy TV challenge.  This week (number 56) we are getting creative with our ribbon.  I used some thin organdy ribbon and a needle to create my rose stem and leaves.    I know that there are a multitude of ways to use ribbon creatively and I can't wait to see what you do!  The rest of my card is fairly basic and just like I like it.  I embossed my card base and rounded a couple corners.  I die cut a black mat and then topped it with the faux stitched and ribbon stitched panel.  Then I popped up my rose on top of the stem.  A small greeting in the corner finishes things off.
Don't forget that Mark's Finest Papers offers a stamp set to one lucky participant.  This week that set is called Blessings and it's super cute!  Here's a look at it.
 
That's all for this post, but stay tuned for another  post later today!!
 
Details - Stamps: Love, Love, Love (MFP), Ivy & Blossoms (MFP); Paper: Sweet Tooth White, Black Licorice; Ink: London Fog, Tuxedo Black; Accessories: Nestabilities, Copic Markers, paper snips, 1/8" organdy ribbon, needle, hole punch, So Trendy M-Bossabilities, corner rounder, stampin' dimensionals.


Thursday, January 17, 2013

Love, Love, Love - A Mark's Finest Papers, A Heinrich Company Blog Hop

   January Blog Hop! 

This month's New Stamp Set Releases are
Fantastic Dogs Featured January 15
No Sour Grapes Featured January 16
In My Den Featured January 17
Love, Love, Love Featured January 18

Please hop along with us! You have a chance 
 to win one of the above stamp sets! Just comment on the following blogs (don't forget this one), each day for more chances to win! (You do NOT have to comment on all the blogs each day! The names are drawn randomly!) All four winners will be announced on January 19, 2013 on the Mark's Finest Papers blog. You can go back and comment if you missed a day. (HINT: The more you comment, the more chances you have to win and comments on the MFP blog count twice!) The deadline for commenting is 11PM EST on Friday January 18,2013.

Happy New Year!!! Welcome to the first blog hop of 2013! We are so excited to share the great stamp sets we are releasing this month and the months to come. 
 The special stamp set we have for you this month is:
" OH Baby"
The mini stamp set we have for you this month is
"Not So Ugly"

 
Now how about that rose in this new set!!!  It's beautiful and I opted to do some paper tole for my role.  I used some paper with a gradient color fade from peach to rose.  Aside from some fussy cutting, which I enjoy, it was pretty easy.  I hand cut, scored and sponged some leaves to accent my rose.  A stamped sentiment from  the set, some rhinestones and some scoring finish off my card 
 
Pardon my short post, I sliced my left index finger while I was chopping green onions to go into our Asian Lettuce Wraps.  My six year old told me that I am on "knife restriction" and can only use a butter knife for cutting now.  Ha, she's a crack up!
 
Anyway, don't forget to visit Sue's blog today.  Thanks for coming by!
 
Details - Stamps: Love, Love, Love (MFP); Paper: Sweet Tooth White, Black Licorice, Kiwi Kiss, SEI Mimosa dp; Ink: Versamark, Kiwi Kiss, Tuxedo Black, Ruby Red; Accessories: Scor-Pal, paper snips, stampin' dimensionals, sponge dauber, SU rhinestones.

Wednesday, January 16, 2013

In My Den - A Mark's Finest Papers, A Heinrich Company Blog Hop


   January Blog Hop! 

This month's New Stamp Set Releases are
Fantastic Dogs Featured January 15
No Sour Grapes Featured January 16
In My Den Featured January 17
Love, Love, Love Featured January 18

Please hop along with us! You have a chance 
 to win one of the above stamp sets! Just comment on the following blogs (don't forget this one), each day for more chances to win! (You do NOT have to comment on all the blogs each day! The names are drawn randomly!) All four winners will be announced on January 19, 2013 on the Mark's Finest Papers blog. You can go back and comment if you missed a day. (HINT: The more you comment, the more chances you have to win and comments on the MFP blog count twice!) The deadline for commenting is 11PM EST on Friday January 18,2013.

Happy New Year!!! Welcome to the first blog hop of 2013! We are so excited to share the great stamp sets we are releasing this month and the months to come. 
 The special stamp set we have for you this month is:
" OH Baby"
The mini stamp set we have for you this month is
"Not So Ugly"

 
Now, on to my card with today's featured set.  We have a thing for maps and globes at our house, so I was immediately drawn to the globe in this set. 
I stamped the globe image on gold card stock and vanilla card stock.  I colored the vanilla image and then trimmed out the pieces separately.  I layered the vanilla on top of the gold and then created a table for my globe to sit on. I stamped my sentiment separately, matted it and then popped it up.  I used the clean and simple stamping blog sketch as my jumping off place.  I didn't follow it exactly so one might say I used it for inspiration.

Thank you for visiting me today and don't forget to go on to Sue's blog

Details - Stamps: In My Den (MFP); Paper: Very Vanilla, Early Espresso, Brushed Gold; Ink: Tuxedo Black, Early Espresso; Accessories: Copic & Touch Twin Markers, paper snips, stripes embossing folder, stampin' dimensionals.

Tuesday, January 15, 2013

No Sour Grapes - A Mark's Finest Papers, A Heinrich Company Blog Hop


   January Blog Hop! 

This month's New Stamp Set Releases are
Fantastic Dogs Featured January 15
No Sour Grapes Featured January 16
In My Den Featured January 17
Love, Love, Love Featured January 18

Please hop along with us! You have a chance 
 to win one of the above stamp sets! Just comment on the following blogs (don't forget this one), each day for more chances to win! (You do NOT have to comment on all the blogs each day! The names are drawn randomly!) All four winners will be announced on January 19, 2013 on the Mark's Finest Papers blog. You can go back and comment if you missed a day. (HINT: The more you comment, the more chances you have to win and comments on the MFP blog count twice!) The deadline for commenting is 11PM EST on Friday January 18,2013.

Happy New Year!!! Welcome to the first blog hop of 2013! We are so excited to share the great stamp sets we are releasing this month and the months to come. 
 The special stamp set we have for you this month is:
" OH Baby"

The mini stamp set we have for you this month is
"Not So Ugly"

 
For today, I have gone outside of my regular style.  This is more layers and more intense colors than normal for me.  I just had to use rich colors with the red wine I envisioned.  I stamped and colored my image and then colored some more over the top of that.  My six year old was cheering me on.  I think she was excited that Mommy wasn't so rigid and neat, but was messy and coloring out of the lines a bit.  I found some complimentary papers and some sheer organdy ribbon.  I also clear embossed over the bottle and the glass.  Here's a close up. 
That's all from me today!  Have a wonderful day and enjoy the hop.  Off you to go see what Sue has created. 
 
Details - Stamps: No Sour Grapes (MFP); Paper: Crumb Cake, Black Licorice, GKD White, 7Gypsies Savannah dp; Ink: Tuxedo Black, Crumb Cake, Versamark; Accessories: Copic & Touch Twin Markers, clear ep, heat tool, black organdy ribbon, scallop border punch, glue pen, glue dots, stampin' dimensionals.