Thursday, November 29, 2012

Just a Note - A Mark's Finest Papers, A Heinrich Company Blog Hop


   November Blog Hop! 

This month's New Stamp Set Releases are
Big City Featured November 27 
Amaryllis Definition Featured November 28
Mountain Selections Featured November 29
Just a Note Featured November 30

Please hop along with us! You have a chance 
 to win one of the above stamp sets! Just comment on the following blogs (don't forget this one), each day for more chances to win! (You do NOT have to comment on all the blogs each day! The names are drawn randomly!) All four winners will be announced on December 1, 2012 on the Mark's Finest Papers blog. You can go back and comment if you missed a day. (HINT: The more you comment, the more chances you have to win and comments on the MFP blog count twice!) The deadline for commenting is 11PM EST on Friday November 30, 2012.

As you all know November is the time to gear up for Christmas shopping. So many sales and crowds, well stick with us we have some great deals for your Holiday Shopping needs.
 The special stamp set we have for you this month is:

"Winter Scenes"

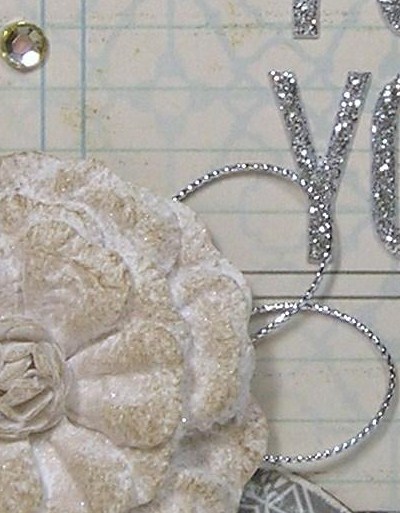
I have had this card in my head from the moment that I laid eyes on this gorgeous set!  This is my attempt at a DIY poinsettia.  I die cut a ton of poinsettia leaves in various sizes and then stamped them all with the sheet music.  Then I sponged them in crumb cake and rose or green.  I finished my flower center with some glue dots and miniature gold glass marbles.  Pink poinsettias are my absolute favorite.  Of course, now that I type this, my darling six year old daughter says, "What is this, a water lily pad thing?"
Oh well, I tried!  Wait...I know, I'll ask my dear readers to weigh in with their opinion.  What sort of flower have I come up with here?
 
Now, you might notice that my flower hangs over the side of my A2 sized card.  A regular invitation envelope will mangle this card.  Check back in the next few days to see the larger envelope that I will make to house this beauty. 
 
Thanks for coming by and don't forget to visit Sue next!!


Details - Stamps: Just A Note (MFP); Paper: Favorite Natural (MFP), Patterns Pack dsp; Ink: Crumb Cake, Soft Suede, Regal Rose, Old Olive; Accessories: Perfect Petals die (Heartfelt Creations), MS Arch Lattice punch, glue dots, sponge dauber, stampin' dimensionals, miniature gold glass marbles, corner chomper.


Wednesday, November 28, 2012

Mountain Selections - A Mark's Finest Papers, A Heinrich Company Blog Hop


   November Blog Hop! 

This month's New Stamp Set Releases are
Big City Featured November 27 
Amaryllis Definition Featured November 28
Mountain Selections Featured November 29
Just a Note Featured November 30

Please hop along with us! You have a chance 
 to win one of the above stamp sets! Just comment on the following blogs (don't forget this one), each day for more chances to win! (You do NOT have to comment on all the blogs each day! The names are drawn randomly!) All four winners will be announced on December 1, 2012 on the Mark's Finest Papers blog. You can go back and comment if you missed a day. (HINT: The more you comment, the more chances you have to win and comments on the MFP blog count twice!) The deadline for commenting is 11PM EST on Friday November 30, 2012.
 
As you all know November is the time to gear up for Christmas shopping. So many sales and crowds, well stick with us we have some great deals for your Holiday Shopping needs.
 The special stamp set we have for you this month is:

"Winter Scenes"


Monochromatic, Masculine, Mailable....that's my first version of Mountain Selections.  This card morphed and morphed until I had a final product.  While it may not look like it, sometimes CAS can be time consuming!
For my second card today, I opted for a daytime scene.  I continued the theme of peace.  I guess that is what the set evokes for me.  I masked my cabin, trees and mountains all together.  Then I sponged the sun, sky and foreground.  A bit of embossing on the layer beneath my scene finishes my card off.
Thanks for coming by today!  I know that Sue has something wonderful for you today so don't forget to drop by her blog
 
Details - Ahh...Peace - Stamps: Mountain Selections (MFP), On The Fly (MFP), A Trip To Lancaster (MFP); Paper: Soft Suede, Favorite Natural (MFP); Ink: Crumb Cake, Soft Suede, Early Espresso, Versamark; Accessories: Clear ep, heat tool, sponge dauber, corner chomper. Peaceful Day - Stamps: Mountain Selections (MFP), Peaceful Nuthatch (MFP); Paper: Sweet Tooth White, Basic Gray; Ink: Rich Cococa, Always Artichoke, Basic Gray, Daffodil Delight, Soft Sky, River Rock; Accessories: Nestabilities, Stripes ef, sponge dauber, blender pen, 1/4" hole punch, stampin' dimensionals. 
 

Tuesday, November 27, 2012

Amaryllis Definition - A Mark's Finest Papers, A Heinrich Company Blog Hop


   November Blog Hop! 

This month's New Stamp Set Releases are
Big City Featured November 27 
Amaryllis Definition Featured November 28
Mountain Selections Featured November 29
Just a Note Featured November 30

Please hop along with us! You have a chance 
 to win one of the above stamp sets! Just comment on the following blogs (don't forget this one), each day for more chances to win! (You do NOT have to comment on all the blogs each day! The names are drawn randomly!) All four winners will be announced on December 1, 2012 on the Mark's Finest Papers blog. You can go back and comment if you missed a day. (HINT: The more you comment, the more chances you have to win and comments on the MFP blog count twice!) The deadline for commenting is 11PM EST on Friday November 30, 2012.

As you all know November is the time to gear up for Christmas shopping. So many sales and crowds, well stick with us we have some great deals for your Holiday Shopping needs.
 The special stamp set we have for you this month is:

"Winter Scenes"


My first project today was directly inspired by one of the sentiments in the featured set, Amaryllis Definition.  "You make the day sparkle" made me think of glitter and from there, I just knew I had to glitter up some Scor-Tape!  I opted for a bookmark this time around.  Shhhh, don't tell anyone, but I had to cut apart my sentiment to make it fit.  That, folks, is one of the beautiful things about clear stamps!  I just trimmed very carefully and deliberately stamped my sentiment.  After I finished, I fit my trimmed pieces back into the original shape.  It's just like a miniature crafty puzzle!
Next up, I made a card.  If you have visited before, you know I'm a CAS kind of girl.  I went simple and colored my Amaryllis Belladonna in a more common red color.  After coloring my flower, I drew a simple black line as a border and double matted my image.  A simple sentiment beneath my popped up image finishes off the card.
Thanks for checking out today's new release.  You are off to Sue's blog now to see what she has in store.

 
Details - Bookmark - Stamps: Amaryllis Definition (MFP); Paper: Sweet Tooth White; Ink: Tuxedo Black; Accessories: Copic and Touch Twin Markers, Scor-Tape, fine glitter, MM black eyelet, black organdy, silver cording.  Amaryllis card - Stamps: Amaryllis Definition (MFP); Paper: Sweet Tooth White, Basic Black, Art Warehouse Neutrals; Ink: Tuxedo Black; Accessories: Copic and Touch Twin Markers, copic multiliner, stampin' dimensionals.


Monday, November 26, 2012

Big City - A Mark's Finest Papers, A Heinrich Company Blog Hop


   November Blog Hop! 

This month's New Stamp Set Releases are
Big City Featured November 27 
Amaryllis Definition Featured November 28
Mountain Selections Featured November 29
Just a Note Featured November 30

Please hop along with us! You have a chance 
 to win one of the above stamp sets! Just comment on the following blogs (don't forget this one), each day for more chances to win! (You do NOT have to comment on all the blogs each day! The names are drawn randomly!) All four winners will be announced on December 1, 2012 on the Mark's Finest Papers blog. You can go back and comment if you missed a day. (HINT: The more you comment, the more chances you have to win and comments on the MFP blog count twice!) The deadline for commenting is 11PM EST on Friday November 30, 2012.
As you all know November is the time to gear up for Christmas shopping. So many sales and crowds, well stick with us we have some great deals for your Holiday Shopping needs.
 The special stamp set we have for you this month is:

"Winter Scenes"
I have a couple of cards to show you today with today's featured stamp set!  I'll start off with my newest card.  For this card, I sponged lots of color onto my card stock while I was thinking about the scene I wanted to stamp.  When it came time to stamp my image, it was super easy as all of the Mark's Finest Papers stamps are clear stamps.  I positioned my image so that it looked like a sunset scene!!

My second card is one that you might have already seen, if you started today's blog hop at the Mark's Finest Papers blog.  I started with a black card base for this one.  I stamped the building stamps four times.  I stamped them 3 times in gray and one time in yellow.  I trimmed out just one of the buildings in yellow and popped it up for interest.  Then I embossed my sentiment in white.  There you have an easy clean and simple card!
Thanks for stopping by!  Don't forget to head on over to Sue's blog to see what creation she has in store. 


Details - Good Luck - Stamps: Big City (MFP); Paper: Favorite Natural (MFP), Core'dination Abracadabra; Ink: Tuxedo Black, Night of Navy, Baja Breeze, Daffodil Delight, Really Rust; Accessories: Nestabilities, sanding block, corner chomper, Recollections rhinestones, stampin' dimensionals, sponge daubers.  Welcome - Stamps: Big City (MFP); Paper: Unknown Black, Sweet Tooth White; Ink: London Fog, Daffodil Delight, Versamark; Accessories: White ep, heat tool, paper snips, stampin' dimensionals.
 

Friends and Snowmen

How about a little holiday fun?  I have it on pretty good authority that the next Friends of Speedy TV challenge is all about snowmen!  I think the timing is perfect as we are quickly approaching Christmas.  I picked some fun sparkly designer paper as my background for this lovely snow woman!  I paper pieced her scarf and hat and glittered up her hat trim, ear muffs and buttons.  I finished it off with a hand drawn snow line and a sentiment. Don't forget that Mark's Finest Papers offers a free stamp set to one randomly chosen participant!!
I followed a sketch from one of my new favorite sketch blogs too!  This is the sixth sketch from the CAS (E) this Sketch! blog.  Instead of making an A2 sized card, I made mine square.  
Thanks for stopping by!  There's lots on my blog today, so feel free to read on a bit.

Details - Stamps: Holly Jolly Greetings (MFP), Poinsettia Blooms (MFP); Paper: Sweet Tooth White, SEI Wintersong dp, Print Pack dsp; Ink: Tuxedo Black; Accessories: Copic Markers, paper snips, glue pen, dazzling diamonds, stampin' dimensionals.

Winter Scenes, A Mark's Finest Papers Bonus

It's time for another look at this month's extra sets from the Mark's Finest Papers November Release.  There is one full set and a mini set in addition to the four sets that Mark's releases each month.  I have a peek at the full set called Winter Scenes.  I used the largest image of the tree within the tree, all three snowflakes and a sentiment.  Good stuff, let me tell you!!  First, I stamped my tree image in white on my purple card stock and then trimmed out my tree.  I stamped and embossed my sentiment and the snowflakes.  I stamped my tree image again on white card stock, colored it and then stamped and embossed with some sparkle.  This card shimmers in person!  Finally, I used some dimensional adhesive to pop the purple up over the main image and then matted it with silver.

I thank you for coming by today.  Don't forget to check out the other peeks on the Mark's Finest Papers blog and then come back tomorrow for some looks at the new sets being released this week.

Details - Stamps: Winter Scenes (MFP); Paper: Sweet Tooth White, Brushed Silver, purple (MFP); Ink: Tuxedo Black, Versamark; Accessories: Copic Markers, Touch Twin Markers, white ep, winter wonderland ep, iridescent ice ep, heat tool, stampin' dimensionals, craft knife.

Scor-Pal and Pink Paislee Week

 
This is the beginning of a really fun week here on my blog and the Scor-Pal blog!  The Scor-Pal team and the Pink Paislee team are working together to show off great product.  Are you ready for six full days of tutorials and eye popping projects?  Me too!
 
Before you head out, here is sneak peek at what I have contributed to this week's festivities!  Be sure to come back around this week for more cards and links to other fabulous designers work.
 
Thanks for stopping by!
 

Friday, November 23, 2012

A Window Box Scor-Pal Tutorial

It's my pleasure to bring you a fun treat box, made super easy with your Scor-Pal.  I present you with a Window Box.  You may want to freshen up your drink, as today's tutorial has lots of pictures.  Happy reading!
The supplies that you will need are:

  • Scor-Pal
  • One piece of card stock or patterned paper, 9" x 6 3/4"
  • One piece of card stock or patterned paper, 1 1/2" x 6"
  • One piece of card stock or patterned paper, 1 1/2" x 9"
  • Acetate, 2 7/8" x 4 7/8"
  • Additional card stock for window frame
  • Scallop edge punch
  • Die cut for window (punch or craft knife would also work)
  • Painter's Tape
  • Scor-Tape
  • Other items for embellishment
Place your paper in your Scor-Pal with the 9" side up against the top fence as shown.  Score at 1", 4", 5" and 8".  I used patterned paper for my box base, so I placed it with the patterned side down.
Turn your paper 90 degrees and score at 3/4" and 5 3/4". 
Again, turn your paper 90 degrees so that the 3/4" score is aligned with the top fence.  Cut out the top left and bottom left squares.  They are marked in the photo with an "X".
Cut on the 4", 5" and 8" score lines from the top and bottom edges to the first horizontal score line.  I trimmed in a triangle shape to help my box come together in a neater fashion later.
Scallop one edge of the 1 1/2" by 9" piece of card stock.  Decorate as desired.  I embossed mine with a snowflake patterned embossing folder.
Line the back of the 1 1/2" by 9" with Scor-Tape.  


Peel the backing and adhere the scallop edged card stock just below the 3/4" section at the top. Turn your project over and re-score at 1", 4", 5" and 8".
Die cut window in front of your box.
Die cut frame from additional card stock.  Line the back of the frame with Scor-Tape
Peel the backing and adhere the frame around the die cut window in the front of the box.  With your Scor-Tool, burnish all score lines for your box. 
Open to the inside of the box.  Line the inside border of the window panel with Scor-Tape
Peel the backing off the tape and adhere the 2 7/8" by 4 7/8" piece of acetate.  Instead of acetate, you could use vellum or a piece of a report cover. 
With your Scor-Tape, line the 3/4" section of the paper.  Then peel the back and adhere down to the inside of the box. 
Scallop both edges of the 1 1/2" by 6" piece of paper.  I further decorated it by adhering two layers of ribbon with my Scor-Tape.  This will be your box handle. 
Adhere one end of the 1 1/2" by 6" piece to  one side panel of the box.  I used a 1/8" circle punch and a rhinestone brad to attach the box handle. 
Line 1" tab on the box side with Scor-Tape.  Peel the backing and adhere it to form the box.  Attach the other side of the box handle in the same fashion as the step above. 
On the bottom of box, line the small tabs with Scor-tape.  Peel the backing and fold them in first.  Fold the bottom of the box up. 
Line the top tab Scor-Tape.  Peel the backing off the tape and fold the tab down, finishing your box. 
Embellish and fill as desired.  I added a couple of die cut snowflakes with rhinestone centers.  Finally, I filled up with window box with the traditional Hershey's Kisses.

Thanks for hanging with me through the whole tutorial!  Don't forget to visit the Scor-Pal blog throughout November and December for lots of beautiful projects!!

Details  - Paper: Sweet Tooth White, SEI Winter Song; Accessories: Scor-Pal, Scor-Tape, 1/8" circle punch, Pretties Kit rhinestone brads, Recollections rhinestones, stampin' dimensionals, Rounded Rectangle die (Verve), Rounded Scallop Frame die (Verve), white organdy ribbon, white grosgrain ribbon, Snowflakes #8 embossing folder, Spellbinders Create a Flake 2 dies; scallop edge punch,
paper snips.


Monday, November 19, 2012

Friends and Thanksgiving

It's Monday and time for another Friends of Speedy TV challenge. If you have been keeping track, we are now on number 47.  Today, we are making Thanksgiving cards.  Hooray, another chance to use some of my favorite earthy colors!  Those earthy colors called out for some acorns and leave and a little copper bow!
Our Thanksgiving plans are up in the air right now.  Hubby wanted to go camping because of the long weekend, but the weather doesn't look really great!  So we have kind of turned down both sides of the family.  Hubby will probably get his way and not have to go anywhere if the weather doesn't cooperate.  He's not a big fan of big celebrations or turkey dinner!
What are your Thanksgiving plans?
Thanks for  stopping by!  Don't forget, Mark's Finest Papers offers up a prize for one lucky participant!!
Details - Stamps:  Daffodil Greetings (MFP), Autumn Splendor (MFP), Autumn Glory (MFP); Paper: Crumb Cake, Early Espresso, Watercolor paper; Ink: Rich Cocoa, Crumb Cake; Accessories: Copic and Touch Twin Markers, Nestabilities, sponge dauber, copper cording, stampin' dimensionals. 


Sunday, November 18, 2012

A Scor-Pal & Hampton Art Tri-Shutter Card


Hello! I hope you enjoyed the Scor-Pal and Hampton Art week long feature! Today, I can share my main project that I made.  If you haven't seen what the rest of the team has made, you will definitely want to check it all out on the Scor-Pal blog. Don't forget about the team on the Hampton Art blog who have been creating like crazy with their Scor-Pal products. Be sure to see what they have designed for your pleasure!!  I offer you a Tri Shutter card
 The supplies that you will need are: 
  • Scor-Pal
  • Scor-Mat
  • 1 piece of card stock, 5 1/2" x 12" (card base)
  • 2 pieces of card stock 1 7/8" x5 3/8" (mat)
  • 1 piece of card stock 2 3/8"x 3 7/8" (mat)
  • 2 pieces of card stock 1 3/8" x 3 7/8" (mat)
  • 2 pieces of card stock 1 7/8" x 2 3/8" (mat)
  • 4 pieces of card stock 1 3/8" x 1 7/8" (mat)
  • 2 pieces of patterned paper 1 3/4" x 5 1/4"
  • 2 pieces of patterned paper 1 1/4" x 3 3/4" 
  • 4 pieces of patterned paper 1 1/4" x 1 3/4"
  • 1 piece of water color paper 2 1/4" x 3 3/4" (image)
  • 2 pieces of water color paper 1 3/4" x 2 1/4" (image)
  • Ruler
  • Craft knife/hobby blade
  • Water brush
  • Stamps
  • Ink
  • Adhesive
  • Other items to embellish
Place your 12" side of your card base against the top fence of your Scor-Pal.  Score at 2", 4", 8" and 10".   
Insert your Scor-Mat into your Scor-Pal.  Align your 5 1/2" side of your card base with the top fence.  Line your ruler up with the 1 1/2" mark on the top fence and use your craft knife to cut a slit between the 2" and 10" score lines.   
Next, line your ruler up with the 4" mark on the top fence and use your craft knife to cut a second slit in your card base between the 2" and 10" score lines.
 
At the 2" score line, create a mountain fold for the top and bottom 1 1/2" sections. 
At the 4" score line, create a mountain fold in the center section and a valley fold for the top and bottom 1 1/2" sections.   
At the 8" score line, create a valley fold in the center section and a mountain fold for the top and bottom 1 1/2" sections.   
At the 10" score line, create a valley folds for the top and bottom 1 1/2" sections.  
 
Here is a view from the top of how your mountain and valley folds will look.  
For my first image panel, I used the Hampton Art set called Home Tweet Home.  (This amazing stamp set has 21 stamps in it!!) I stamped the bird cage and the chain images in Colorbox Archival Dye Ink in Wicked Black which I had stamped off once to get a nice gray color.  Then I stamped one of the bird images (there are six different birds in this set) in Colorbox Archival Dye Ink in Mudslide.  I used my water brush to water color the bird with Colorbox Archival Dye Ink in Mermaid. 
For my second image panel, I used the tree branch with leaves.  I stamped it in opposite directions with the Mudslide ink.  Again, I used my water brush to water color the leaves on the branches with Colorbox Archival Dye Ink in Putty.  Finally, I stamped this sentiment in Wicked Black ink.   
For my final image panel, I stamped a different tree branch in Mudslide ink and water colored the leaves with Putty ink.  Then I stamped a different bird image on the branch in Mudslide ink and water colored it with Mermaid ink.  Lastly, I stamped the sentiment up above in Wicked Black ink.
A final bit of embellishing with stamped chains, fussy cut tree branches and a loopy die cut finishes the card. 
 
I hope you enjoyed today's tutorial.  Thanks for reading all the way through it! 
 
Details - Stamps: Home Tweet Home (Hampton Art); Paper: Very Vanilla, Early Espresso, Spice Cake dp, Elegant Soiree dp; Ink: Wicked Black (Hampton Art), Mudslide (Hampton Art), Putty (Hampton Art), Mermaid (Hampton Art); Accessories: Scor-Pal, Scor-Mat, craft knife, Aqua Painter, Apron Border die, adhesive.