I hope you have enjoyed this fun cross promotional week we have had with the folks at
Pink Paislee! Today, I want to share my main project that I created for this week. There were some really amazing projects created by the
Scor-Pal team and the
Pink Paislee team. Be sure you see them through each of the team blogs!! I have made a project called a
Cardfolio, a folding box to hold four to eight cards and envelopes.
The supplies you will need are:
First, cut your 12" x 12" piece of patterned paper. You will need to trim a 2" x 12" piece off; cut that in half ending up with two 2" x 6" pieces. Then trim off a 1" x 12" piece off; cut that piece in half ending with two 1" x 6" pieces. Finally, trim remaining piece to 9" x 11 1/2". I have used a piece of Pink Paislee patterned paper from the
Portfolio collection named
Unbelievable.
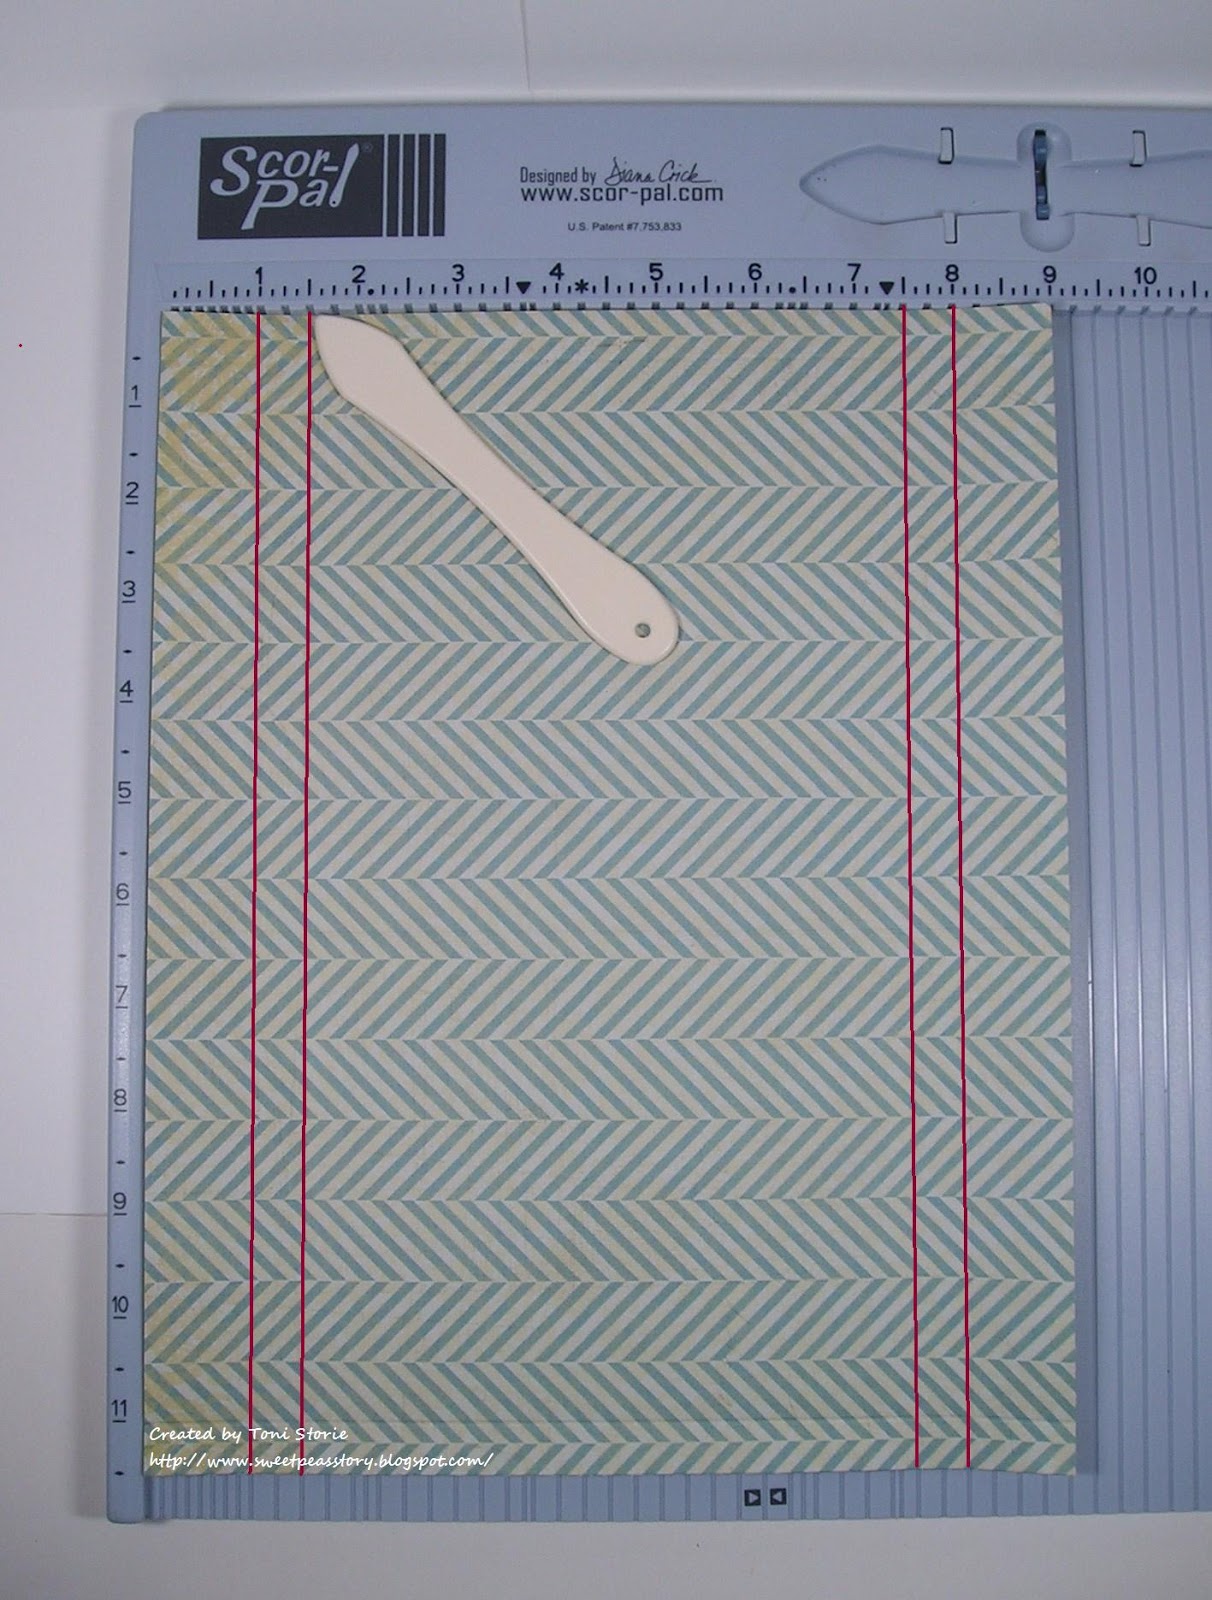
Place your 9" x 11 1/2" piece of paper into your
Scor-Pal with the 11 1/2" side against the top fence. Score at 1/2", 5 1/4", 6 1/4" and 11".
Turn your paper 90 degrees and align the 9" side against the top fence. Score at 1" , 1 1/2", 7 1/2" and 8".
Take one of the 2" x 6" pieces of paper and place the 2" side against the top fence. Score at 1/2". Repeat on the second 2" x6" piece.
Returning to the 9" x 11 1/2" piece of patterned paper. Trim out the four corners as marked. You will cut on the 1/2" score line until it meets with the 1 1/2" score line. Cut on the 5 1/4" and 6 1/4" score lines until they meet the 1 1/2" score line. Cut on the 1" score line between the 5 1/4" and the 6 1/4" lines, leaves a 1/2" tab.
Round the corners of the four inside flaps of the project , as shown below.
Round the corners opposite the 1/2" scored section of both 2" x 6" pieces of patterned paper.
Adhere
Scor-Tape to the inside 1/2" scored sections of the 2" x 6" pieces. Adhere
Scor-Tape to the center of one 1" x 6" piece of patterned paper. Discard the other 1" x 6" piece of paper.
Place you project base desired pattern side down, remove adhesive backing on the 1" x 6" piece and adhere in the center. This will reinforce what is to become the spine of your cardfolio.
Place your project base desired pattern up, remove adhesive backing on the 2" x 6" pieces of paper and one to each 1/2" flap on the right and left sides of the project.
Burnish all your folds. Adhere
Scor-Tape to the small spine tabs and to both sides of each flap as shown.
Remove adhesive backing on the small spine tabs and adhere then to the inside of the project. Remove the adhesive backing on the right and left flaps, fold the top and bottom flaps in and adhere the side flaps down. This will create pockets on each side of the spine.
Embellish as desired. I wrapped two lengths of twill tape and one length of lace around the center of my cardfolio. Then I die cut two label shapes from some more patterned paper from the
Pink Paislee Portfolio line, specifically
Amazing and
Remarkable. I muted the
Portfolio alphabet stickers with some tea stain ink and created a sentiment. Finally, I added an
Artisan Collection Flower which I personalized with some again ink and sparkle. I finished my floral embellishment with some die cut leaves, silver cording and colored rhinestones.
I want to give you a look at the inside of the cardfolio which has plenty of room for cards and envelopes. Here you can see that I used some velcro to keep my cardfolio closed.
Thanks for hanging with me to the end!
Details - Paper: Portfolio Collection (Pink Paislee); Ink: Tea Stain, MM aging ink, crumb cake; Accessories: Scor-Pal, Scor-Tape, Portfolio alphabet stickers (Pink Paislee), Artisan Flowers (Pink Paislee), yellow twill tape, Victorian crocheted lace trim, silver cording, Nestabilities, sanding block, corner chomper, rhinestones, Touch Twin marker, glue dots and velcro.


2 comments:
So pretty, Toni! I love all the different papers you used. Wow!!
Wow! The box is gorgeous!!!! What a wonderful idea!!!
Post a Comment